Tutorial | Mix Your Kits: Project Life® Cards on a Scrapbook Layout with Geralyn Sy
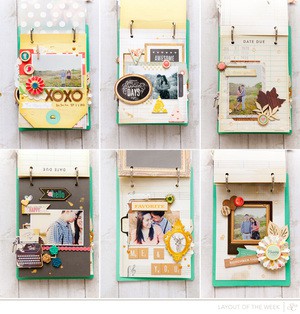
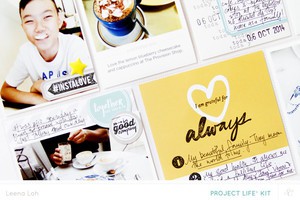
The Lisse Street Project Life® kit is one of my favorite kits because of the versatile journal cards and cool embellishments. For this tutorial, I wanted to show you how easy it is to use the journal cards on a page! Today, I’ll walk you through my process of putting together a grid design layout.
I started by cutting up my journal cards into 1.5” squares. Many of the designs on the cards can easily be cropped without losing any important design element.

Then I used my paper trimmer and cut a bunch of 1.75” squares from white cardstock.

I glued my photos (I chose four 1.5” photos) and journal card squares onto the white cardstock squares.

I chose kraft cardstock to be the base of my layout. Then I lay out my squares onto my page, arranging and rearranging them until I was happy with how the grid design looked. Once I was satisfied, I glued the squares down.

Using the Silhouette software, I traced, enlarged, and cut one of Marcy’s printables from this month to create my "currently" title. I wanted it to be big enough so it would be a major focal point on my layout, so I enlarged it until the width was about 7.75.”

I glued my title to the middle of my layout using foam adhesive to add some dimension to my page.

I pulled a couple more embellishments from the Project Life® kit – I added washi tape to the top of my page and letter stickers for the initials of my niece and nephew. I also printed out some labels to use on my layout.

The last step was to add my journaling. I simply jotted down a few notes in a couple of the squares.

Hope you enjoyed seeing how I put this layout together! It was quite easy and I didn’t even need to use any patterned paper as I relied on the journal cards to add patterns and colors to my page.


Supplies: Lisse Street Project Life® Kit – journaling cards, washi tape, alpha stickers; Lily – journaling cards; Cardstock – American Crafts; printables – Lisse Street Printable by Hello Forever, Lisse Street Printable Labels by Hello Forever; die-cutting machine – Silhouette; pens – Muji, Pilot


oh my goodness I love this!
Sign in or sign up to comment.
wow this is so pretty!
wauuuuu @akkpenn great! Thank you so much for the advise, I usually cut on the white surface on the back of that paper putting the shapes in the reverse mode :)
Sign in or sign up to comment.
Gorgeous and wonderful idea!
Sign in or sign up to comment.
I love layout and will so be lifting this idea!
Sign in or sign up to comment.
You are so good at this!
Sign in or sign up to comment.
This is such a great page
Sign in or sign up to comment.
I actually sort my PL kit according to whether i will use the cards on a layout or in PL, some lend themselves better to layouts.
Love this one.
Sign in or sign up to comment.
im in love with this layout and glad i order a second pl kit this month.
Sign in or sign up to comment.
beautiful layout!! LOVE it!!
Sign in or sign up to comment.
This is really great, and I am totally lifting it! Thank you so much for the inspiration!
Sign in or sign up to comment.
Amazing!
Sign in or sign up to comment.
this is so beautiful and amazing and you are so talented!!
Sign in or sign up to comment.
Beautiful layout!
Sign in or sign up to comment.
That bold title rocks!
Sign in or sign up to comment.
This looks great!!
Sign in or sign up to comment.
Once again LOVE IT!! :-)
Sign in or sign up to comment.
This is absolutely gorgeous! So inspiring :)
Sign in or sign up to comment.
Love this! Thank you fpr the ideas!
Sign in or sign up to comment.
This is awesome! I love all of your LO's... Thank you for including tips, I'm a newbie!
Sign in or sign up to comment.