Turn Your Papers into Tassels! | Natalie Elphinstone
CHA is always a good time to find out what the latest trends are to hit the scrapbooking scene. One thing that caught my attention was the party themed collections with their bright colors and fun embellishments, and I noticed that tassels seemed to make a few appearances around the place. Whilst waiting eagerly for these new products to arrive I thought I’d try my hand at making some simple paper tassels to adorn my latest layout.
Here's how to make tassels of your own!
1. Cut a length of paper 4x1” and start snipping into it, stopping just short of cutting all the way through. The finer you make the strands, the closer your finished tassel will look like the real deal. This part is a little monotonous so is a good activity to do in front of the TV or some other distraction! Keep going until the entire length is cut into strands.

2. Apply a small amount of liquid glue (I used Glossy Accents) along the top edge and tightly roll the paper up.

3. Tie a length of embroidery thread around the tassel near the top. Don’t snip off that leftover piece of thread yet - I’ve purposely left it reasonably long, and you’ll see why shortly. Tease out the bottom of the strands with your fingers to add some volume.

4. Use Versamark Ink and White Zing to emboss a series of feathers onto a scrap of patterned paper.

5. Add some extra color with a touch of waterpaint. I like to use my waterbrush and Peerless Watercolor Papers because it’s virtually a no-mess technique.

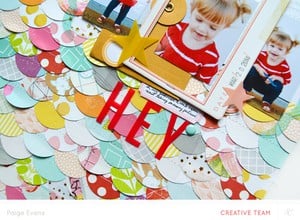
6. Cut out the feathers and attach one to the shorter piece of dangling thread on each of the tassels. Now you’ve got some fun and funky embellishments ready to decorate your project. I’ve added a few in a cluster to my layout, made with different papers and hanging them at different lengths to make it more interesting.
 They look great added to a layout! I hope you have fun making some of your own tassels. They're the perfect way to use up some of the extra paper you've got lying around your craftrooms!

 Supplies: High Wire Add On (papers, diecut shapes); Flying Trapeze Add On (papers, stamp); Versamark Embossing Ink; Zing Embossing Powder: Opaque White; Peerless Transparent Watercolor Papers; Waterbrush; Glossy Accents; Embroidery Thread


Love your layout. The feathers and tassle are great! Thanks so much...
Sign in or sign up to comment.
absolutely LOVE this Natalie!!! Your added tassels are the perfect touch...
Sign in or sign up to comment.
Natalie this is the most amazing blog post that has ever been on the Studio Calico page. I love, love, love this tutorial.
Sign in or sign up to comment.
Such a fun trend. Thank you for sharing the technique.
Sign in or sign up to comment.
brilliant!
Sign in or sign up to comment.
Love it! Gotta make some!
Sign in or sign up to comment.
LOVE this :-)
Sign in or sign up to comment.
Such fun and so different.
Sign in or sign up to comment.
GORGEOUS!! I may need to do this technique!!
Sign in or sign up to comment.
So Amazing
Sign in or sign up to comment.
Thanks for sharing this great idea!
Sign in or sign up to comment.