Weekly Challenge | Painted Background with Beshka
Tags:This week, our member Beshka (username bckueser), is challenging you to get out your paints and create a colorful background for your next project. We're excited to turn our weekly challenges over to the SC community! Check in each week as we ask one of our members to inspire you with a challenge based on one of their projects from our member gallery. Be sure to follow Beshka here at SC to see more of her work and keep up with her!
Hello, hello, I hope you all had a wonderful & relaxing weekend! Today I have a new weekly challenge for you, are you ready? It seems most of us have a pretty decent stash of acrylic paints, watercolors, & Mr. Hueys, I would like to challenge you to create a layout backdrop using paint and/or other assorted liquid colors. Painting a backdrop for your photos and embellishments is fun and super easy! You can paint horizontal stripes like I did, paint vertical stripes, or use a stencil to create both a colorful & patterned background.
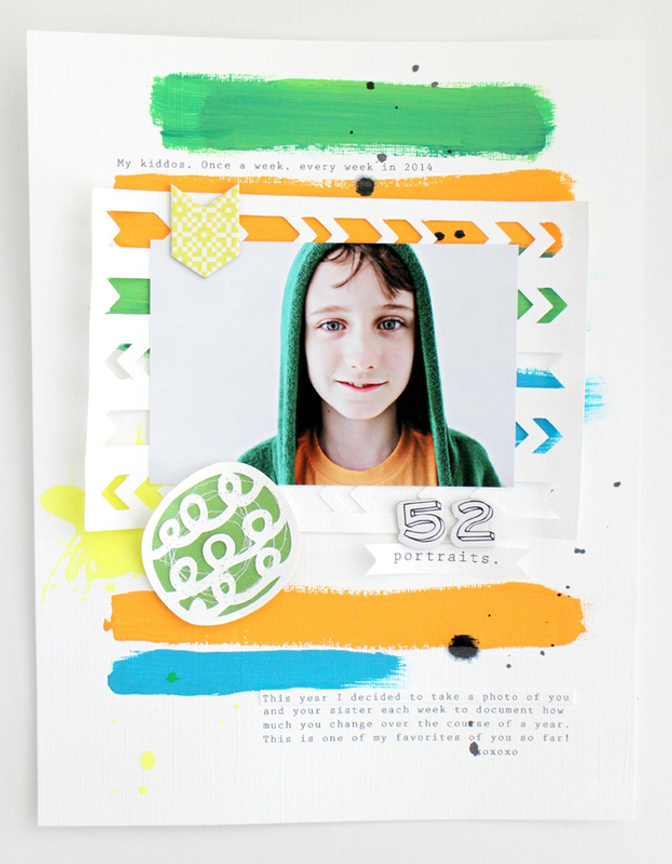
To create this layout I chose a white base so my colors would pop. I then selected 3 paint colors and 2 Mr. Huey's mist colors. While I wanted some pop I also wanted to keep it simple. My first step was to get my journaling done and on the page. I ran my page through a typewriter and guessed at my spacing. I figured as long as I left room for a photo...I could easily work my paint around my type! For my pops of color I used a basic foam brush, dipped it into a color and then ran it horizontally across the page. For each color I made several passes back and forth so my stripes would have good coverage and I made each one a different length for variation. I alternated colors and continued down the page until I had the amount of stripes I wanted. The next step was to add some misting blobs. For the black splatter I just removed the spray nozzle and shook some ink out onto the page and for the yellow I removed the nozzle and poured a little ink onto my page. I then used a paintbrush to move the yellow ink around and make my blob messier & bigger. Yep, I am a very technical gal, blobs & messes that is how I roll. While the paint dried I printed my photo and pulled out my embellishments. Since my page is 8.5x11 I printed my photo as a 3x5. I didn't want to completely cover all my handiwork, however, I did want some layers. I used my Cameo to create cuts with cut-outs so that I could add layers but still allow my paint will show through. Once I had my cuts I layered my largest like a frame under my photo and attached it to my painted backdrop. I then painted a piece of scrap and sewed it under another cut and used that layered piece as an embellishment. To finish my page off I then added a small chipboard element & a quick title, all done. Now it's your turn, I cannot wait to see what you come up with!!! Happy Creating!
Now it’s your turn to create a project based on Beshka's challenge! Share your new project for the challenge in the SC gallery (add the hashtag #SCchallenge to make it easier to find!), then link up your project in the comments of this post by May 5th to be entered to win a $5 gift card to the Studio Calico Shop!


Comments
Sign in or sign up to comment.
8 comments
I am still in awww when I am looking at this layout. Love it sooooo much!
Replies to aniamaria
Sign in or sign up to reply.
Me too! So bright and fresh, perfect for Spring. Hoping to participate this week too...love a good challenge *thumbs up*
Replies to ChantalPhilippe
Sign in or sign up to reply.
Love it. Here's mine:
http://cdn.studiocalico.com/gallery_pictures/images/000/248/229/large/24.jpg
Replies to StampingRooster
Sign in or sign up to reply.
Here's mine:
http://www.studiocalico.com/galleries/122340-master-class
Replies to penny
Sign in or sign up to reply.
I used gold gilding liquid and a large dauber to create a gold polka dot transparency as the background for this layout.
http://www.studiocalico.com/galleries/122370-hello
Replies to juliee
Sign in or sign up to reply.
And another, 'cuz I love to paint
http://cdn.studiocalico.com/gallery_pictures/images/000/248/949/large/26.jpg
Replies to StampingRooster
Sign in or sign up to reply.
Your page is gorgeous!! I watercolored on my page.
http://www.studiocalico.com/galleries/122494-butterfly-kisses
Replies to CristinaC
Sign in or sign up to reply.
I used watercolors for the background and the stamping: http://www.studiocalico.com/galleries/122610-nsd-watercolor-wreath
Thanks for the challenge, Beshka.
Replies to NancyM
Sign in or sign up to reply.