Scalloped Border Layout Tutorial | Paige Evans
Tags:SANDLOT scrapbook kits and add ons
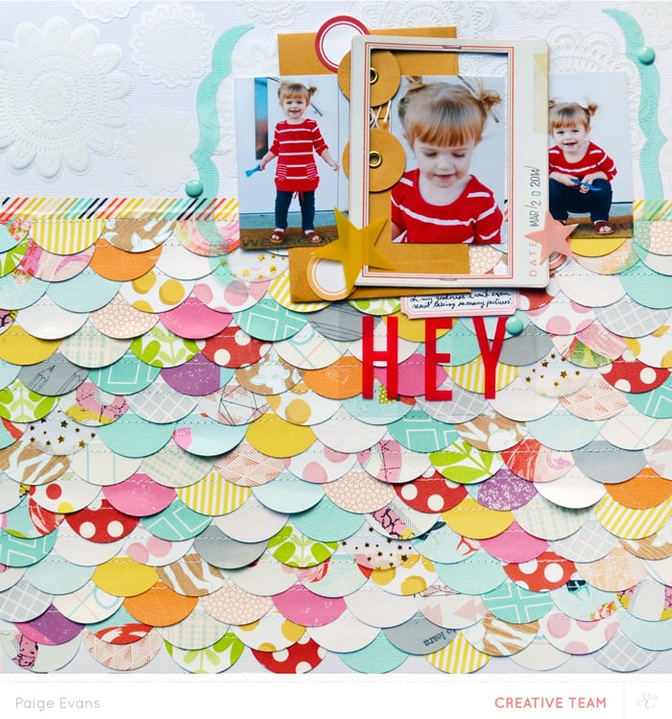
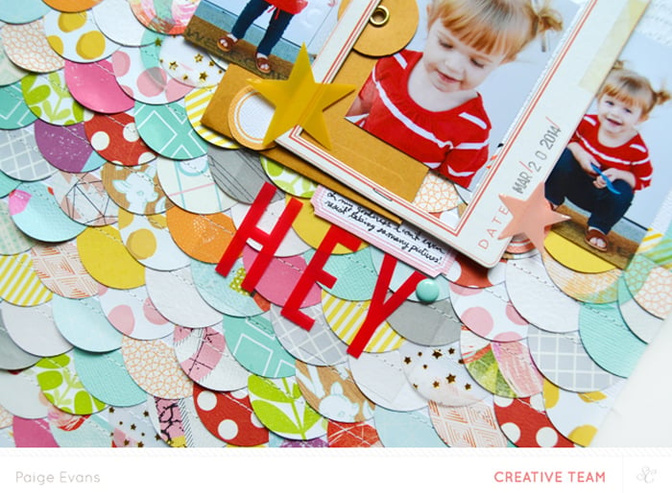
Journaling says: Oh my goodness I can't even resist taking so many pictures!
How To: Punch 4-5 circles from most of the patterned papers found in the SANDLOT, HERCULES, SMALLS, and JET kits. Trim each circle in half to create a whole bunch of semi circles. Starting at the bottom of a white cardstock layout base, line up a row of semi circles then sew across the top edge. Make the next line off-center from the first row and sew across the top. Continue making rows of semi circles about 3/4 of the way up the page. Trim a piece of rainbow striped washi tape in half and place it across the top edge. Place the doilies from the HERCULES kit across the top for a pretty white-on-white texture. Layer an envelope from the JET kit, photos, and a chipboard frame across the top right. Place parenthesis Heidi Swapp masks around the photos as a frame. Tuck printable labels and add plastic star die cuts under and around the photos. Journal on the label and place "HEY" acetate letters below the pics for a title. Add three blue enamel dots around the top in a visual triangle to finish.
Supplies : Scrapbook kits - SANDLOT, HERCULES, SMALLS, and JET by Studio Calico; Sewing machine - Brother; Thread - Coats & Clark; Printable labels - Hello Forever for Studio Calico; .03 Black Precision Pen - American Crafts; Cardstock - American Crafts; Roller date stamp - Kesi'Art; Ink: StazOn; Circle punch - Fiskars


Comments
Sign in or sign up to comment.
9 comments
WOW. You are genius in repetition!
Replies to shicchan
Sign in or sign up to reply.
Paige this is seriously such a beautiful, incredible layout! Thank you so much for sharing it with us! I love those doilies from hercules in the background - they are so pretty!
Replies to toribissell
Sign in or sign up to reply.
This is so fun! I love the movie, A Walk to Remember - one of my faves! Thank you for sharing this video!
Replies to amy_mallory
Sign in or sign up to reply.
This is so fun! I love the movie, A Walk to Remember - one of my faves! Thank you for sharing this video!
Replies to amy_mallory
Sign in or sign up to reply.
This is so fun! I love the movie, A Walk to Remember - one of my faves! Thank you for sharing this video!
Replies to amy_mallory
Sign in or sign up to reply.
I just love this idea. What a great idea to use up paper scraps. Gorgeous!
Replies to Karilynn
Sign in or sign up to reply.
Also in love with this layout!! <3 This layout is what encouraged me to join today! Pinning and will do this technique on my new Project Life book!
Replies to shellybergman
Sign in or sign up to reply.
oh my gosh, Paige...this is just wonderful! I started a thread earlier today wondering what to do with scraps! We're so in sync...;) Plus, I ADORE your photo layering here...it's just fantastic!
Replies to maggie_massey
Sign in or sign up to reply.
I love this layout! Thank you for the video.
Replies to PrinzessinN
Sign in or sign up to reply.