My Scrapbooking Process | Carson Riutta
Tags:My Photo Process:
My layouts always begin with the photo or photos. When I sit down to create, I pull up all my recent photos (I use the ThisLife app and desktop program by Shutterfly, to automatically migrate all my iPhone pictures onto my desktop) and chose a couple that speak to me. The next step, the editing process, always brings out the perfectionist in me. I've gone to great lengths to make this part easy and still give me the results I'm after, and by lengths, I mean money :) After using any and every free editing program out there and not being happy with my final pics, I bit the bullet and invested in Photoshop Elements and RadLab. The two programs, working together, allow me to edit a bunch of pictures quickly and easily and with fabulous results. When editing, I always want my pictures to "pop." It's a bit of a mantra, so I always brighten, sharpen and increase the contrast. I may get a little crazy with the saturation too. Once I've edited the pictures I want to use, I will then print out a few good ones so that I have a couple options for when I begin configuring my layout. I do all my printing at home on my Canon Pro 9000 (a Christmas gift last year). I don't believe you need all the fancy equipment and programs to do this hobby well, but I find that they make it quick, easy and beautiful and it keeps me creating instead of trying to manipulate photos or plan ahead with my printing.
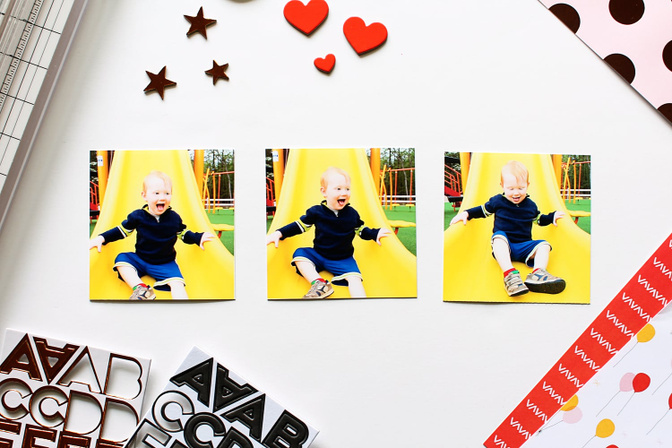
For this layout I printed these three pictures from our day at the park. I loved all three, but I wasn't crazy about the framing of the first two and so I kept the third as an option even though you can't see his face as well. I'm glad I did too because I ended up going with the third picture after I realized he would be up in the air looking down from his balloon.
Decisions, Decisions:
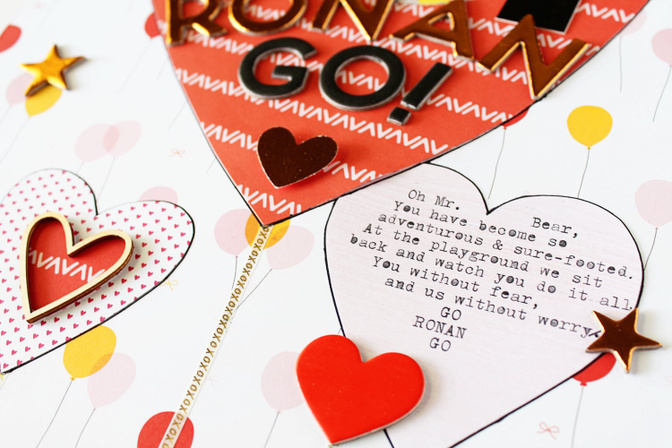
I absolutely loved the vibrant yellow slide behind him, but I wasn't crazy about all the other equipment in the frame, so in an attempt to eliminate the mess, I thought I would crop the picture to a circle, something I've never done before. I pulled out my circle dies and cut it tight so all you can see is the kiddo framed by yellow. Once I had my circle picture, things began to flow. I rifled through my alpha tray, as I was thinking about the story I wanted to tell and I found my giant black alphas from the Cirque kit. My picture was about the right size to sub for an O and I thought the word GO would be a fitting start to the story. Sadly, there was no exclamation mark in the alpha, but I needed it to frame the picture, so I cut one from the V and made it work.

Journaling:
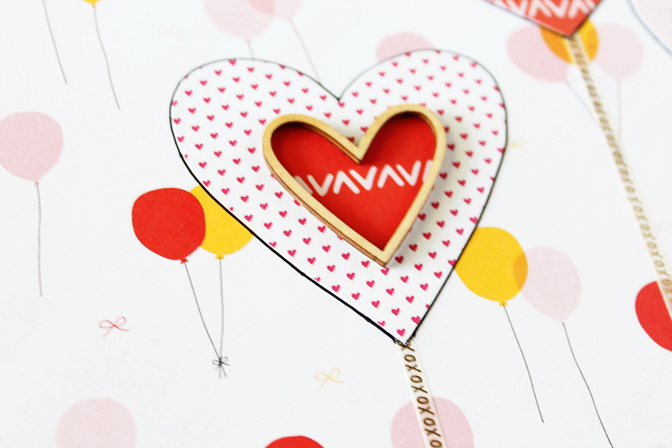
One thing I often struggle with is the journaling. I'm always thinking about the story I want to tell, but I get so lost in the process of page design that I completely forget about the journaling until the end. Usually I have to find a way to work my journaling onto a label and into the design at the very end. I love this kind of layout, where the journaling placement is "slap you across the face" obvious. It was only natural that the journaling would be on a smaller heart balloon, Again, I freehand drew the balloon on a piece of patterned paper from the Cirque card kit, and fussy cut it out. I grabbed a scrap of paper and wrote out my journaling. I then affixed my heart to a piece of printer paper with removable adhesive and ran it through my vintage typewriter. I'm not a fan of my handwriting and so my typewriter gets a ton of use, it's probably the most well loved gadget in my arsenal.

Final Touches:
The last step is always placing final embellishments and tweaking elements here and there until scrapbooking perfection is reached, Ha! The layout needed a bit more copper on it to balance the "Ronan" and so the stars found their way onto the layout. and of course the balloons needed some strings and how amazing is that xoxo washi? I think it was made for this purpose! And finally the balloons needed to "pop" a bit more off the background, so I very carefully, took a pen and outlined each balloon. That small and risky act really made all the difference between a layout the worked and one that was slightly off.
All in all my process is pretty organic and each decision I make stems from the decisions that come before. I find that when I try to manipulate things by using a sketch or a specific paper, that I don't always achieve creative flow and the process becomes a lot harder. However, those things also stretch my creative muscles, so they are sometimes a necessity for growth. I'm hopeful that you've found my approach useful or at least kind of interesting. I would love to answer any questions you have in the comments, so please don't be shy and fire away!
Happy Scrapping!
- Carson
Supplies: Carolina Moon Scrapbook kit, Dean, Cirque Scrapbook kit, Cirque Card kit


Comments
Sign in or sign up to comment.
7 comments
Thanks for sharing your process, I've gained a few tips to use in the future. Lovely layout, love the use of that washi as the string and all the play on balloons!
Replies to Brinkleyboy
Sign in or sign up to reply.
Great layout! I love how vibrant and happy it is. You picked a great alpha to use, too. Thanks for sharing your process, I enjoyed reading.
Replies to mtercha
Sign in or sign up to reply.
Love it!
Replies to goldenblind221
Sign in or sign up to reply.
So glad you like the layout and post ladies, your kind words and enthusiasm are the best! @goldenblind221 @mtercha @Brinkleyboy
Replies to Carson
Sign in or sign up to reply.
This is adorable @carson!!
Replies to welobellie
Sign in or sign up to reply.
this just makes me happy!
Replies to Leah
Sign in or sign up to reply.
It's lovely! Thanks for sharing the layout and process!
Replies to Sophiesticated
Sign in or sign up to reply.