4 MORE ways to use Digital Journaling Cards | Pam Baldwin
Tags:digital journaling cardsProject Life® kits and add-onsdigitalProject Life®
1. Turn them into greeting cards!

I love cards, I really really do. I can spend an hour or more standing in a Hallmark store looking for the perfect card because truth be told, I’m not much of a card maker. Have you ever looked through your collection of journal cards and thought about how perfect that card is for someone in your life? I totally do that. I had a great time whipping up a bunch of cards for special occasions and “just because” using the digital PL cards from the Galileo and Carolina Moon releases. A couple of huge advantages to doing this: First of all, they are digital and printable which means you can make as many of them as you want!! You can print multiple copies and cut them up for layering and adding a bit of dimension.
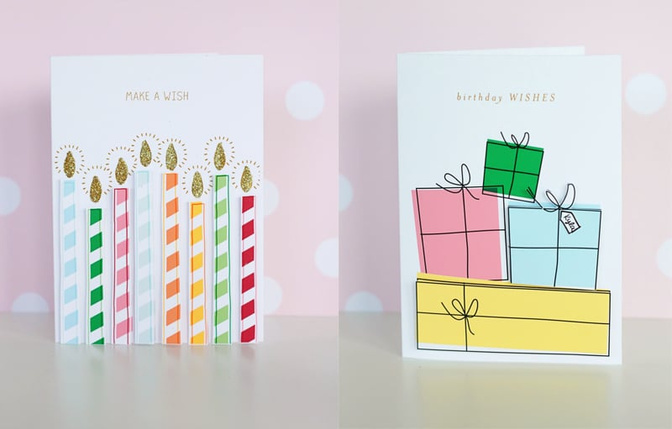
I used the digital version of the Birthday Card set by Life.Love.Paper
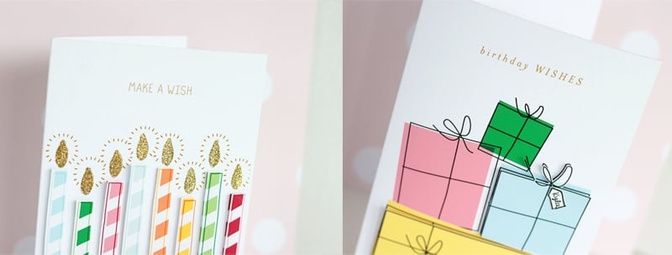
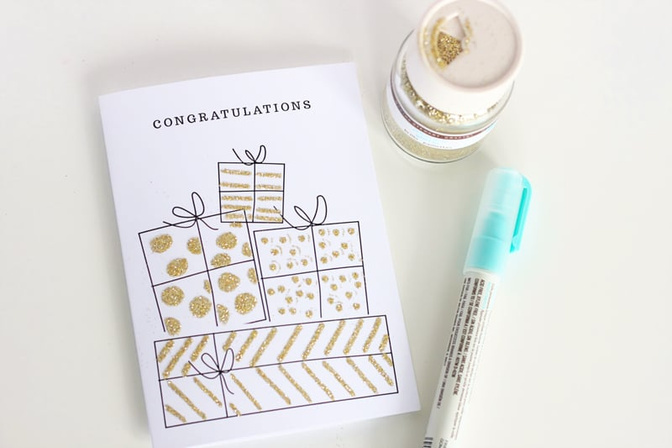
I have to talk about the card with the picture of the presents in particular because this one got me really excited thinking about all the possibilities. You can change the color of those presents digitally before you print it (I’ll show you how in the video tutorial) and bam, you’ve got the perfect card for just about any occasion!! You could make them different shades of pink or blue for a baby shower, make them red and green for simple little Christmas cards, make them white for and add a little glitter for a bridal shower or wedding, or get crafty have fun with some watercolor paints. So SO many possibilities with that card.
The second big advantage, you can customize the digital version to make your cards any size you want!
You can make them square or rectangular, rounded corners or squared corners, whatever your preference. The only limitation might be the size of the paper/printer you’re working with. I’ve got a standard size Canon Pixma that prints 8.5 x 11 and I don’t feel limited by that for this type of project at all.
2. Customize your own patterned paper to coordinate with your kits.
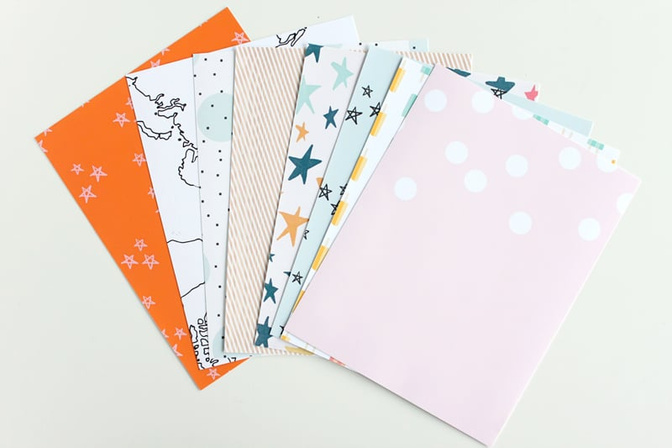
The quality of these cards is so good, you can easily enlarge them to 8.5 x 11 and still have a fantastic looking printed image. You can resize them so the scale of the pattern is exactly what you’re looking for and they coordinate beautifully with your scrapbook kits, giving you a whole new world of options! Yes, this may use a lot of ink, BUT you can print as much or as little as you need and the cards are downloaded instantly. That means, instant gratification of having patterned paper to work with while you’re waiting for your kits to ship.
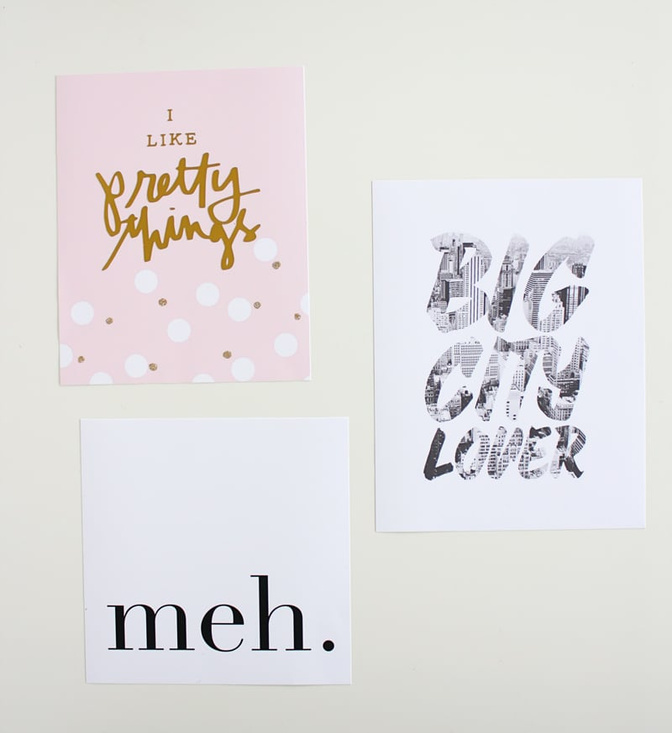
3. Art Prints
I’m completely, 100% guilty of hoarding some of my favorite Project Life®
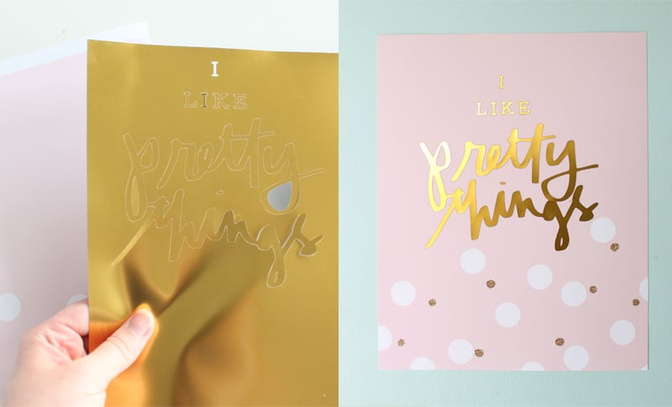
“I like pretty things” Yes please!! I’m not sure if I’ll keep this print for myself or hang it up in my daughter’s room. I used 2 of the digital cards from the Carolina Moon release to make this print. I enlarged the pink and white polka dot card on an 8 x 10 canvas in Photoshop Elements and printed it out onto matte photo paper. Then I opened the PNG version of the quote card in my Silhouette Studio, traced it and cut it out of printable adhesive gold foil. (This would probably look even BETTER with a “MINC” but I’m still saving my pennies for one of those.) I added just a few spots of glue and gold glitter to this print, just for fun.
4. Photo overlays

I’m going to mention the birthday card set by Life.Love.Paper
Hope you’ve found some fun ideas and inspiration. Have a wonderful day!
- Pam
Supplies: Various Digital Designs; Galileo Digital Journal Cards; Galileo Digital Journal Cards (Main kit); Galileo Birthday Printable Journal Cards by Life.Love.Paper


Comments
Sign in or sign up to comment.
22 comments
Fabulous post! Thanks for sharing these ideas with us and for the tutorial. I am definitely going to do this. I love the cards you made too:-)
Replies to artgirlbev
Sign in or sign up to reply.
I've always thought that about digi files but just have never taken the time to figure it all out and do it! I can't say enough about this month's card sets, and just love the birthday set so much!!
Replies to Brinkleyboy
Sign in or sign up to reply.
Awesome tutorial!! Thanks for sharing. :-)
Replies to khartwell
Sign in or sign up to reply.
Hi Pam--I'm a total newbie with PSE and did pretty well with your tutorial, but I am having a problem with the card I create maintaining its size. No matter what size I create, the card always stretches to the size of letter size paper which is the size I used for the blank canvas. Just now I made a 3 x 3 card and it stretched to the edge of the 8.5 edge of the paper. What could I be doing wrong? I'm using PSE 12. Thx!
Replies to artgirlbev
Sign in or sign up to reply.
You are a genius! Thanks for sharing!
Replies to julietaing123
Sign in or sign up to reply.
Thanks for sharing. Your tutorials are so easy to follow.
Replies to Leanne1965
Sign in or sign up to reply.
Great ideas.
Replies to Neela
Sign in or sign up to reply.
Thank you.great tutorial!! I think I missed what type of matte photo paper you like?? Could you share :)
Replies to lovemyava
Sign in or sign up to reply.
Hey @lovemyava :) I've been using the Staples brand Matte photo paper for my printables for a few years now. It's a nice bright white on both sides and seems heavier than some of the other matte photo papers I've tried (...looking at it now, the package says it's only 61 lb, but it still works pretty great!). I've heard people say really good things about the Epson matte presentation paper as well, but I haven't tried that one yet :)
@artgirlbev , I've sent you a message :)
Replies to PamBaldwin
Sign in or sign up to reply.
Excellent video. You have a gift for making a complicated topic easy to understand. I have been working with Photoshop Elements for years and I learned something new from your video. Thank you. Also great ideas.
Replies to FChopp
Sign in or sign up to reply.
Whoa! Super cool! I love the digital elements and you've brought them all to another level! Awesome!
Replies to jamiewaters
Sign in or sign up to reply.
awesome post Pam. I look at digi cards in a new way now. Which collection was the I like Pretty Things from? I don't see it in the shop but wanted to check.
Replies to NinaChow
Sign in or sign up to reply.
SUCH amazing ideas Pam! Thanks for sharing.
Replies to confettiheart
Sign in or sign up to reply.
Fabulous ideas and video. Thanks so much for sharing these tips and techniques. Now I'm inspired to give the digi files a go!
Replies to anniefb
Sign in or sign up to reply.
@NinaChow , it was from the Carolina Moon release! Every once in a while some of the past digi stuff seems to pop back up in the shop, so keep an eye out! It's a really good one :)
Replies to PamBaldwin
Sign in or sign up to reply.
@PamBaldwin this was such an inspiring post!!! thank you thank you thank you!!!! xo
Replies to sideoats
Sign in or sign up to reply.
I went searching for the 'I like pretty things' card too, hopefully it's one they bring back. I'm kicking myself that I didn't get it the first time round when I was looking at it, lesson learned I guess :-)
Replies to SusyFitz
Sign in or sign up to reply.
Wonderful video! Thank you for sharing such great and awesome information.
Replies to brreyes
Sign in or sign up to reply.
love all the ideas and definitely love digital printables!
Replies to tortagialla
Sign in or sign up to reply.